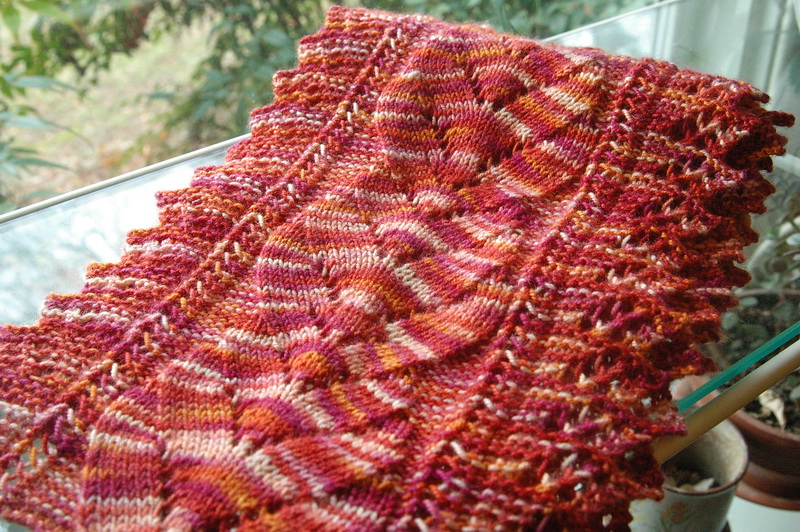
Back in September I decided to get crazy with the cheez-whiz and learn how to knit solely from a chart. What is a chart you might ask if you were a question asking kind of person? Most patterns I have seen, up to this point, are written patterns. They are a set of instructions written in Knitting Kode that tell you what to do – k1, p2, yo … the ever popular p2togtbl … and such things. Like a recipe, you follow the directions for “ingredient” and quantity and eventually you get a finished object.
A chart is a method of visually conveying that same information, kind of like a map. You have a legend that tells you what symbol represents which stitches and then those symbols are arranged on a grid that you follow in a specific manner. Most commonly you follow the chart in the same way that you knit; starting in the bottom right hand corner and reading right to left. When you hit the next row you do not return to the right hand side but instead read the return row from left to right. Exactly how you knit.
The deciding factor for me learning this technique is that I fell in love with a pattern The Bromeliad Shawl by Nicole Eitzinger (sorry, Ravelry link). And so the first chart I decided to use:
I might have been smoking something when I made this decision, who knows?
On the plus side, the yarn that I decided to use for this? I only had one skein. So I had to modify the pattern a bit from a shawl to a scarf. In the above chart I kept the edging (the two columns on the outside edges) dropped the next two columns (coming in from both sides) and kept the 3 center columns. Then I knit and knit and knit and knit and knit ….
until I ran out of yarn. Which I did last week and now it is all blocked and finished!
The yarn is Socks that Rock in colorway Firebird and I was a little worried that it would be too busy for the pattern. But I think that the movement of the stitches really accentuates the color and vice versus.
It was a bit of a pain in the ass, but I think it was worth the results. And now, now I am confident in my ability to use a chart to produce a finished product. If there is anyone out there that has been timid about using charts I tell you go for it. It really is a better way to navigate lace than a written pattern.
Anyone out there have a pattern that they have been eyeballing but afraid of because of a chart? Share it with us and I am sure we (the internet) can help you thorough the ordeal.


Oh, I always use charts for lace. Written directions are so much harder to follow for anything but a super basic lace. Have you seen the patterns that make animals and trees and stuff in lace stitches? I have a hat with lace trees on it. LOL
Very beautiful, and great advice! I’d love for you to submit this to the M&T Spotlight at http://www.makeandtakes.com/spotlight
I would be honored. If there is anything you need from me, please let me know.
And now I am going to go lose about an hour looking at that site.
Thanks <—– needs sarcastic font. 😉
I knit lace with charts and with a written pattern, I find either way not difficult. The only problem I usually have is the different symbols each pattern uses. your scarf can out beautiful
oh I have tried to read charts a few times and each time failed! Your modifications look great!!
I might just be inspired to give it another try.
xxxooo
Yay, you should go for it! That is why I posted this, if I can do eet anyone can.
Beautiful work! Great job, it was definitely worth the effort of reading the chart. I know how intimidating charts can be when you first look at them, but you did fantastic!!
Thank you! Once you understand it, it really is better than written directions. But overcoming the initial WTF of it all is tough.
I HAVE to have a chart, I just get lost with the written directions. I’ve just (as in, this week) started charting my own patters too 🙂
Gorgeous!!
this is a really dumb question, but with the chart, when we have a yarn over step do we count that as a stitch or knit/purl a stitch with the yarn over?
YO count as a stitch. Unless you are increasing the size of your piece, a YO is almost always paired with a decrease. So for every YO you have, there will be a decrease that turns two stitches into one stitch and everything evens out. Of course, in the edging of this particular piece, there are unpaired YO’s on each right side row. Which means that the edging grows one stitch at at time. But, every 8 rows you bind off the extra stitches and are back where you started. That is what gives the edges of the piece the pointed triangles on the edging.
thanks very much!!! 😀