Til There Was You

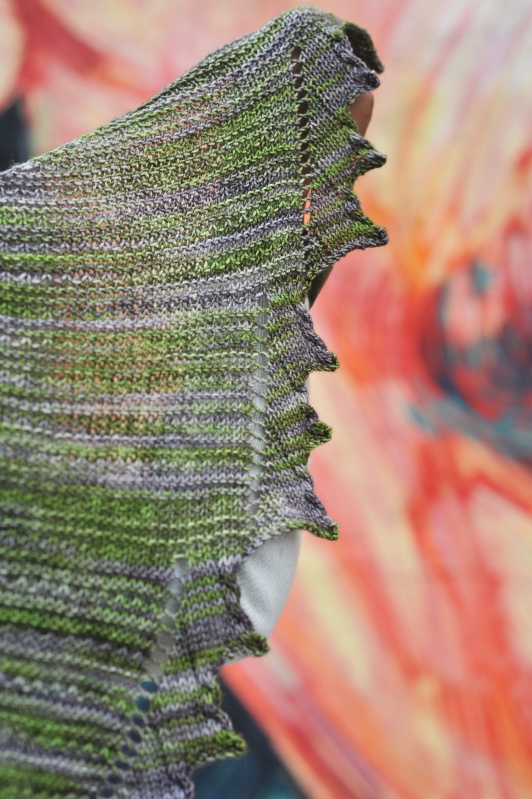
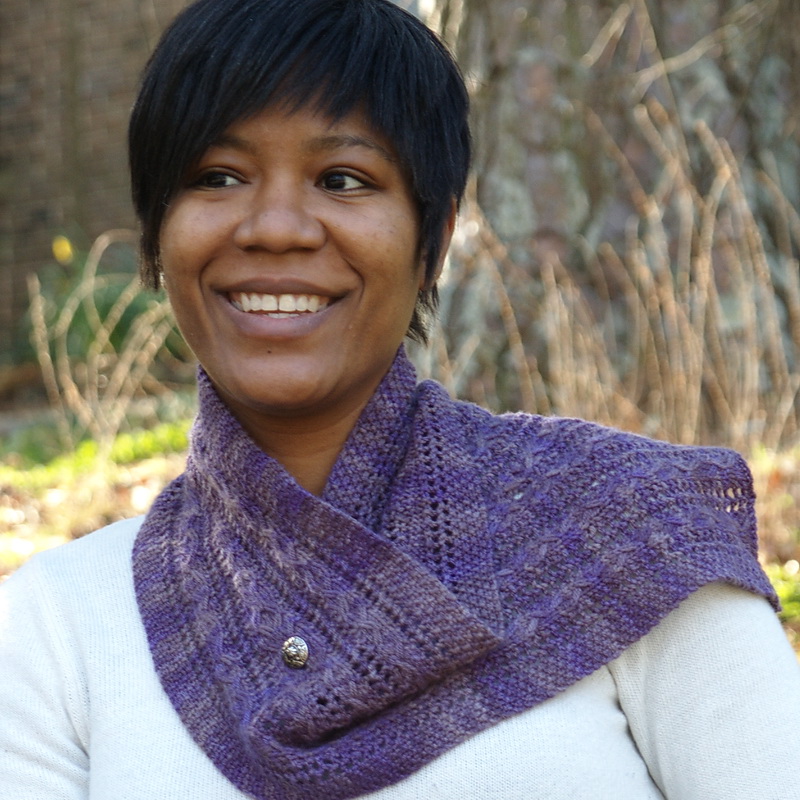
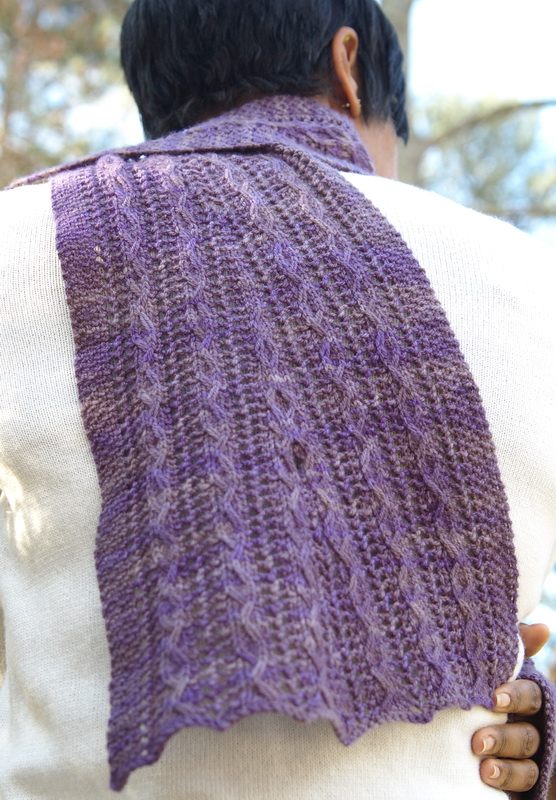
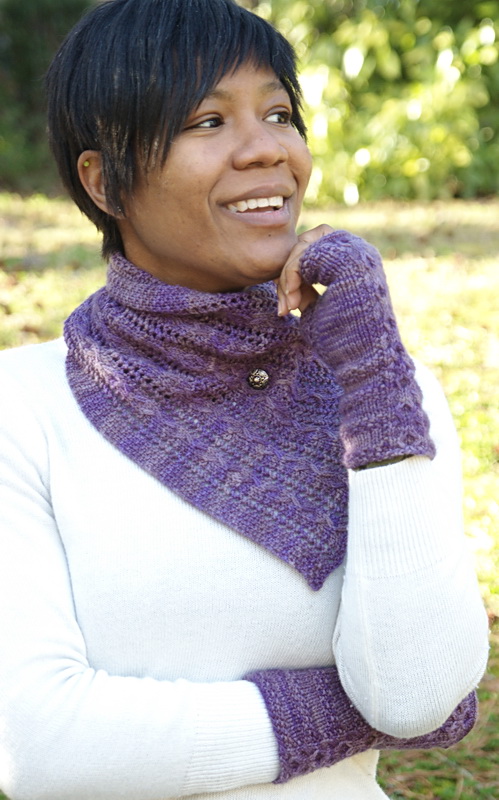
The design of this shawl was driven almost entirely by the yarn. I had come up with a shaping idea, but other than that I had little to no ideas of what the details would be. It was me and the yarn and a bunch of swatching for quite some time. What precisely did this yarn like? What did it do well? And I found that it really loved cables. The chunky weight gave the cables great presence even with a 2/2 cross and the softness and bloom filled the cables in to create a wonderful field of texture in the basket weave pattern. You may recognize the Stitch Sprouts Crater Lake from a previous pattern release. This one has actually been in the works since before that one, but patterns will do what they will. Some cooperate, some take more nurturing.

Til There Was You  - An elegant white shawl with bulky yarn and cables.

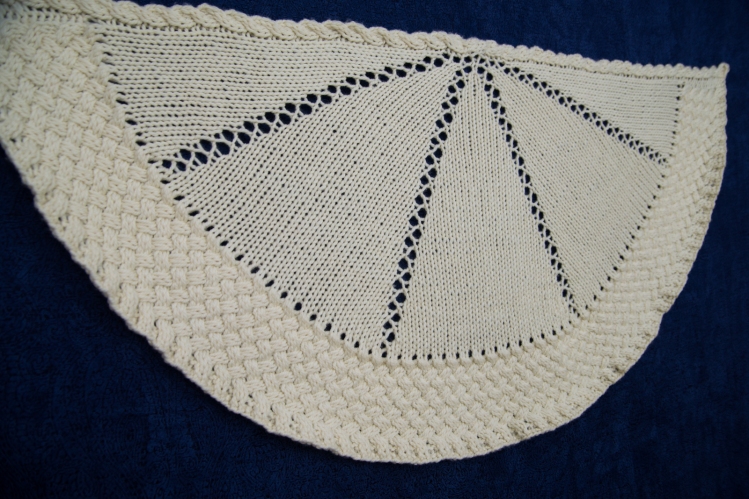
Ever since In Uffish Thought I have been enamored of the idea of using a cabled selvedge to prevent rolling because it just looks so cool. For this the challenge was making the cable run seamlessly along the top edge when the construction was top down. The solution to that is Judy’s Magic Cast on, only worked flat. I didn’t want the texture of the cables to overwhelm the shawl so I kept the body simple. This also had the bonus of highlighting the lines of lace that make up the functional increases of this shawl. This wedge increasing eventually transitions into a pi-shawl increase to provide a blank slate (without increases) for the basket-weave trim.

Til There Was You  - An elegant white shawl with bulky yarn and cables from Barbara Benson.

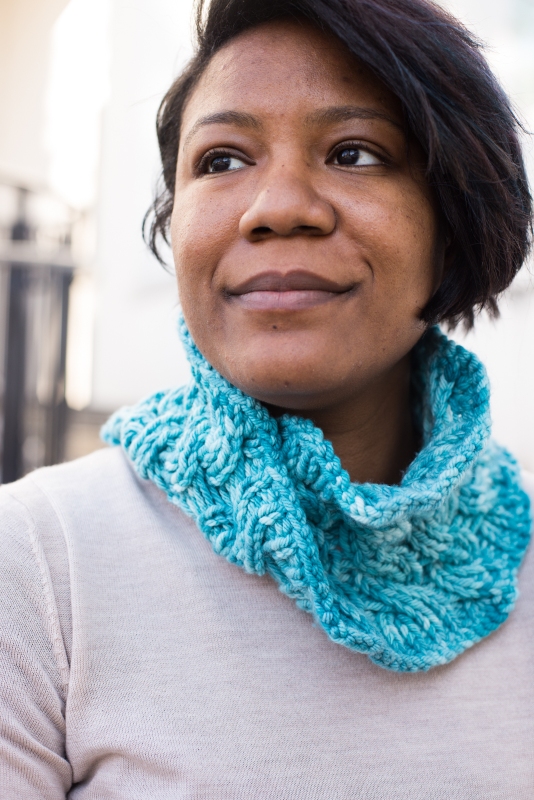
A 10.5 needle produces beautiful drape,

You can easily size the shawl up and down by increasing or decreasing the number of repeats you work of the stockinette body. The rule of thumb to remember is that the trim will take about 50% of your yarn. As written the body takes about 150 grams of yarn and then the trim takes 150 grams. If you want to knit the body for 200 grams then you will need at least 200 grams for the trim. Does that make sense? And of course – since you are changing things on the fly, you might want to have an extra skein, just in case. 😉

Til There Was You  - An elegant white shawl with bulky yarn and cables from Barbara Benson.

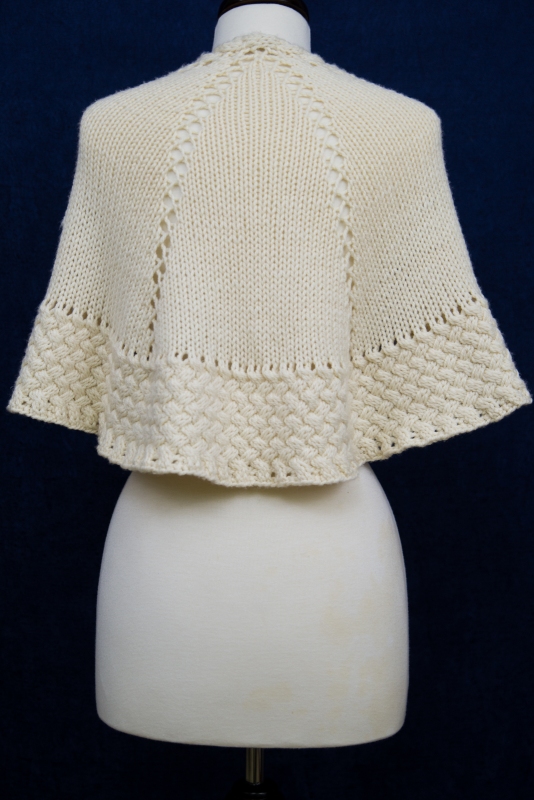
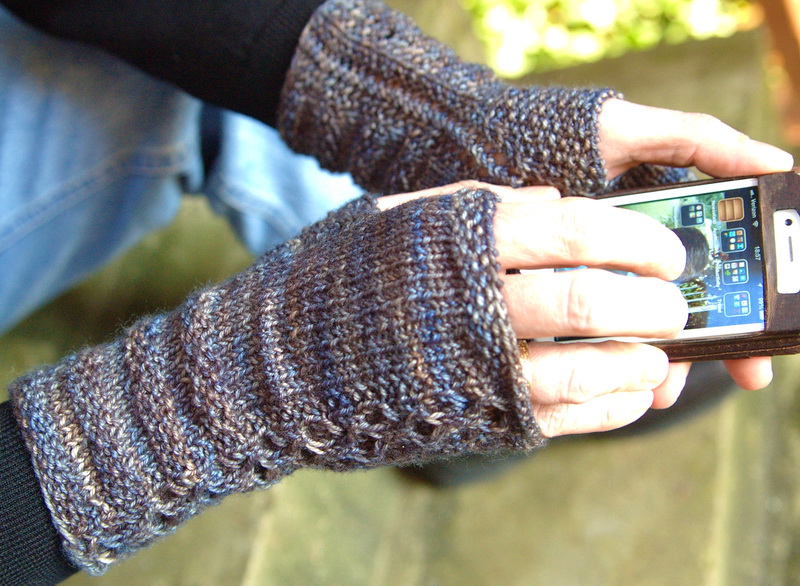
I love the weight of the trim.

If you would like to check out the video tour of this pattern here it is!

Cabling without a Cable Needle

I love wee cables. Something about the texture and sinuous nature of only a couple of stitches wrapping around each other just makes me happy. Possibly it is just part and parcel of a general attraction for cute little things, but whatever – I own it.

Tiny cables on the edge of In Uffish Thought, a shawl by Barbara Benson.

The cables on the edge of In Uffish Thought are a perfect example.

What I don’t like is doing lots of small-ish cables using a cable needle. All that picking it up and putting it down? I end up with it in my teeth, or jammed into my hair, or stuffed in my cleavage … you know how it is. So I don’t. Use a cable needle that is. I cable without a cable needle, seems like an obvious solution, eh?

And you know what? It isn’t hard or scary and it is the subject of my latest video. If you would like to learn how to do it yourself (or just see if how I do it is different from how you do it) check it out!

If you have a technique that you would like to see me demonstrate, please drop it in the comments of the video or this here bloggie blog.

Reversible Cable Moebius Cowl

I have been cheating. I admit it. I should tattle on myself to the teacher but I haven’t.

Each year as the holiday approaches I come to the realization that I need to get knitting on something for my son’s teacher. But I cheat, or double dip if you will. If I am going to be spending time knitting on a gift I might as well get a new pattern out of it, right? So when I say that this new pattern is good for gift knitting, I really mean it because it was designed and knit as a gift!

When it is cold and you are out corralling about a million second graders on the playground do you need to be fiddling with the ends of a scarf? I am gonna go with no on that one. So a cowl it was to be. For naming ease I used the recipient’s last name. So meet McClanahan.

McClanahan, a reversible cable Moebius cowl in worsted, aran, and chunky weights. By Barbara Benson.

I may have mentioned that I am in the throes of a minor obsession with Moebius construction, this is the pattern that started the whole thing. But because of timing and stuff it is only now getting released. After I finished knitting the prototype I decided I wanted to work it up in multiple different weights of yarn – to give the pattern more bang for the buck. Thinking about what yarn to use I remembered how much I enjoyed working with Dream in Color Classy for Cables are Cool and I thought I would see what the color geniuses over there might have in stock in the chunky / aran  yarn weight range.


Reversible cable Moebius cowl by Barbara Benson, three yarn weights in Dream in Color.

Mammoth in Rio Verde Blue

It must have been in the stars because their response was that they were in the finishing stages of introducing both a new Chunky and a new Aran weight yarn. Get OUT of here! So I got my grubby little mitts on Mammoth and Canyon and rounded out the plan with their lovely worsted weight single Calm. I asked them to pick out some awesome colors that would go well together because I had this vision of a photograph with a squooshy pile of cables. And they did not disappoint.


Reversible cable Moebius cowl by Barbara Benson, three yarn weights in Dream in Color.

The Yellow/Green is Calm in Prickly Pear.

Back to the pattern (I can talk about yarn all day), since you always see both sides of a Moebius I went with reversible cables. Essentially the whole thing is ribbed. The cast on is seriously the most complicated part of the whole pattern. Once the stitches are on you have some knits & purls and a cable once every couple of rows. As my son would say “Easy peasy, lemon squeezy.” I think that one came from last year’s teacher (For her I designed I Can’t Control my Fingers).

I have provided the cast on and instructions for all three weights and the circumference of the respective cowls are inversely proportional to the weight of the yarn. And what I mean by that is the chunkier the yarn the closer to the neck the cowl will sit. The worsted weight (skinniest yarn) has the largest circumference. I tailored it to fit the yardage. If you wanted a looser cowl you could use the cast on for one of the other sizes, but then you would need additional yarn. Which, two skeins isn’t that bad is it?

A reversible cabled cowl worked in Moebius by Barbara Benson in Dream in Color aran weight yarn.

This is Canyon in Goblin Valley

To finish up the pattern I had some awesome test knitters take a whack at knitting it up and I tried something different. Usually I have a “secret” place to do the testing, but this time I decided to do it in “public”. If you are a Ravelry member and want to see the growing pains in all of their glory check out the testing thread. You can see what the testers thought of the pattern and how they helped me to whip it into shape. Once they were done it took a turn with my awesome Tech Editor and now it is available for you.

I would love to hear what you think in the comments.

Cables are Cool

Cables are Cooool <<<click for pattern page on Ravelry

First off, you have to say the title of this hat in the correct way. You have to use your best number 11 (Matt Smith) Dr. Who voice. (link is to video). It is a subtle reference, but hey, I like to amuse myself.

Cables are Cool: A two color cable hat featuring slipped stitch color work by Barbara Benson

Cables are Cool

Now – you probably know I have a weakness for slipped stitch/mosaic style color work. I keep dreaming up ways to incorporate it into other knitting techniques to try and do something a wee bit novel. And it avoids stranding. I don’t like stranding. I mean I can totally do it if I really want to, and I might yet design a stranded pattern, but for now I am having too much fun with slipped stitches.

Cables are Cool: A two color cable hat featuring slipped stitch color work by Barbara Benson

This is the smaller version

Which led to this hat. My newest victims are cables. How to create a cable that looks like two different color cables that weave in and out of each other. I think I managed the effect quite well. Now, this isn’t a beginner level pattern. I had to create my own cable nomenclature (which might give you a clue to why these two posts came about) and fiddle about with the charting software a bit. But I think I ended up with something that makes logical sense.

Cables are Cool: a two color, slouchy cable hat with slipped stitch color work by Barbara Benson

I love it when I catch Fatimah laughing

And then there was the matter of yarn. I wanted to use something that had a wide palate of colors that people could choose from and that was a joy to knit with. Luckily I was able to work with the amazing color minds at Dream in Color and they provided their luscious new revamp of their worsted base Classy. Super soft and easy to work with, I am thinking it will become my go-to for when I want a plied worsted yarn. Nice and floofy and in a bajillion colors, I just couldn’t go wrong.

Cables are Cool: a two color, slouchy cable hat with slipped stitch color work by Barbara Benson

I like the brim and think I could have gone even bigger.

For shape I wanted to go with a nice slouch, mostly because it allowed me to repeat the cables more – because more cables = good. I decided to end the cables before I really got into the crown decrease because really, who wants to fiddle with the decreases and the cables at the same time? The fun thing with this technique is that it allowed me to have this cool stripey pattern on the top. If you wanted you could switch to knitting in solid after you finish the last cable and have a solid top.

Cables are Cool: a two color cabled hat featuring slipped stitch color work by Barbara Benson

See, laughing

After finishing the first hat I had a ton of yarn left over and I decided to go ahead and knit a smaller version. The Adult/Large is a very loose fitting hat. It stays on but does not bind the head. Because of that people with heads on the smaller end of the spectrum might find it a bit too big. Hence a smaller size. But it is for quite small heads and will therefore also be appropriate for your bigger youths (tweens/teens). While knitting the smaller hat I also tried out a brim variation because – well, why not? Because it is just ribbing you could make it as long as you want to have a big fold-over brim. I went with four inches total for a 2 inch brim when folded.


Between the different sizes, brim options and color choices – you can really make this hat your own. I cannot wait to see what people knit up? What do you think your preferences would be?


Anatomy of Cable Abbreviations, part two

I seriously had to resist naming this post “part Deaux” or  “Abbreviations Reloaded” or “The Cable Strikes Back” … I am just full of the silly.

Onward and upward!

Learn how to decipher a written cable abbreviation in a knitting pattern, part Two. -TumpedDuck

Cable/cross two right

Diving right back into crossing cables – we are now looking at Right and Left cables.

To start off with, these are 100%, absolutely identical to the Front and Back cables in execution, we are just looking at different nomenclature. Po-tay-toe, po-tah-toe as one says. Now for the break down

  1. C – once again letting you know you are fixin’ to cable or “cross” your stitches. This is the same as understanding that ‘k’ is telling you to knit and ‘p’ is telling you to purl.
  2. A Number – nothing new here. This is letting you know how many stitches are involved in your upcoming cable. In this case you will be crossing 2 stitches, but how? (As usual, if the number is even it is assumed that you will split the stitches evenly.)
  3. Direction – here is where things are changed up. With Front and Back you are being told what to do with the stitches. Left and Right lets you know what the end appearance of the cable will be after you have completed the stitch swap. Yeah. I know. It is time for a picture
Understanding how a Right Cable moves - TumpedDuck

A Right Cable


What you see to the right is a Right crossing cable. The black arrow represents the stitches moving to the front and the brown arrow is the stitches moving to the back. Right is referring to the direction of movement of the stitches that are held to the front of the work. The arrows show the directionality of the stitches. When considering the constituent stitches of the cable (here there are a total of two stitches) you are moving the left-most stitch to the front and over the right-most stitch.

Try to remember: in a Right cable the front stitches move from left to Right.

Learn how to decipher a written cable abbreviation in a knitting pattern, part Two. -TumpedDuck

Cable One over Two Left

Understanding how a Right Cross Cable (CL) moves. - TumpedDuck

A left Cable

As in the Back/Front cables, you can also have an uneven number of stitches and the abbreviation works pretty much the same way.

  1. C – I think you might have this by now. C = this is a cable. You, dear knitter will be cabling before you know it!
  2. A Number – remember, this is not a fraction. The / symbol should be read as “over”, so this tells you that it is a one over two cable. If you were passing two stitches over one then the number would be written 2/1.
  3. Direction – this is a Left cable so you know that your end result is a cable where the front stitch(es) appear to twist to the Left. In the case of this stitch you already know from the number that your single stitch is passing over the other two stitches. Because this is a Left cable that means that the first stitch is held to the front, you knit the next two stitches and then the held stitch. The single stitch is passing from the right to the Left. If you follow the diagram to the right you can see the black arrow representing the direction the front stitches move.

For a Left cable try to remember that the front stitches mover from the right to the Left.

Now, I find the Left/Right naming convention to be considerably more confusing than the Front/Back, but to each their own. Whatever clicks the best in your brain you just go for it! If you need to draw parallels between the two styles of naming you can try to remember that Right = Back and Left = Front. My mnemonic for that is R&B. For some reason my musical nature always associates R&B together (Rhythm and Blues anyone?) so I can remember that R(ight) goes with B(ack).

Incidentally, this is the same way I remember how to work a Right leaning increase. When you want your M1 to lean right you pick the strand up from the back. R&B just go together (in my crazy brain). Do you have any knitting mnemonics?

Anatomy of Cable Abbreviations

My newest project has been working on cables. For some reason lace came instinctively to me. YO = hole. Big circle on a chart = hole. Even the basic increase and decrease abbreviations and symbols made complete sense. (Well, I admit to having a bit of difficulty remembering which of ssk vs k2tog leaned which way) But cables are a challenge.

Not precisely a challenge to actually knit , I can follow instructions just fine. But to truly internalize what all of the symbols mean – well, that has taken some time. And I don’t know that I can say with 100% certainty that I have got it. Hopefully I am close. While writing a pattern I have had to come to a concrete decision on one particular issue. Abbreviations. I have to pick a style and stick with it, and there lies the conundrum.

Are the two kinds of cable crosses Front/Back or Right/Left. They both mean the same thing but represent two different ways of thinking about things. To prevent any suspense, I settled on Front/Back because that is what makes the most sense to me. But there really isn’t a correct way of doing it. As long as I remain consistent I hope that everything will work out all right.

To the subject at hand. For now I don’t want to address reading cables on a chart. It isn’t that difficult to find guides to reading charted cables, but when I started really looking online to find somewhere that breaks down understanding the abbreviations used in written instructions for cabling – well, I came up a bit short. I am going to put this out there, and it is my understanding of how it all works. If I have erred at some point, please do not hesitate to let me know personally or in the comments. As I said, I have come to grips with cables through a difficult path and I might have miss-stepped along the way.

The best way to understand how to cross a cable is to read the instructions provided in the pattern. A good pattern writer will describe how you are to execute the cable based on the abbreviation they use. That being said, I would like to arm you with the ability to suss out what the cable means if you are in a situation where details are unavailable. Onward (allonz-y)!

Learn how to decipher a written cable abbreviation in a knitting pattern. - TumpedDuck

Cable Two Back

This is what a basic cable abbreviation looks like. The specific cable illustrated would be written out Cable Two Back. The abbreviation can be broken down into three elements – which I have labeled as such.
  1. C – this big ole c starting things off announces, “Hey, we are fixin’ to cable!”. Some say that the C stands for cable others that the C stands for cross. Regardless, when you see the C prepare yourself to cable.
  2. A Number – the number tells you how many stitches are involved. (edited for accuracy, for original see*) In this example there are two stitches involved which will be crossing one over one. You could also see C4B – which would indicate crossing 2 over 2, C6B … and so forth.
  3. Direction – this tells you whether you are crossing Front or Back. This letter can be one of four options B, F, R or L. For now we are sticking to F & B, specifically looking at a Back cross. When dealing with the Front/Back naming system you are being instructed what to do with the first stitches you come to. With Back this tells you that the first 2 stitches of your 4 stitch cable will be held to the Back of the work, the next two stitches will be knit (and therefore cross to the front of the work) and then you will knit the stitches from the cable needle.

If there is no number, meaning that you have run across the abbreviation CB or CF, then you can safely assume that it is a 1/1 cable. With CB you would hold the first stitch to the back knit the next stitch and then knit the held stitch. With CF you would hold the first stitch to the front knit the next stitch and then knit the held stitch. Pretty much C2B and CB mean the same thing. Capiche?

Learn how to decipher a written cable abbreviation in a knitting pattern. -TumpedDuck

Cable One over Two Front

But what do we have here? There appears to be a fraction in the middle of my cable! Looks can be deceiving, there is no fraction (waves hand). It is a different kind of cable.

  1. Why hello there Mr. C – you are once again telling me that we shall be cabling forthwith.
  2. A Number – but what a strange looking number indeed. When you see this notation it is telling you that you have an uneven cross. It is not a fraction but instead the number of stitches that you are working with (as above). This particular one is a One over Two cross. The number in the first position tells you how many stitches will be at the Front of the work and the second number tells you how many stitches will travel behind, regardless of whether or not it is a Front or Back cross because …
  3. Direction – and here we have a Front cross. As I said above this tells you what to do with the first stitches you encounter. You will have to do a little figuring with this. You have a 1/2 cross which means that you know that you will need to be holding 1 stitch to the front of the work and crossing two stitches behind – but in what order? The Front tells you “Hey, the first stitch you come to goes to the Front!” so you would take the first stitch, hold it to the front of your work, knit the next two stitches and then knit the held stitch. The reflected version of this stitch is C1/2B. Reading it you would hear “Hey the first stitch(es) you come to go to the Back!” and since it is a 1/2 Cross (where you know the single stitch always goes to the Front) you would hold the first two stitches to the Back knit the next stitch, and then knit the two held stitches.

These uneven crosses are usually an uneven number 2/3, 1/2 but they can be an even number of stitches that are worked unevenly. You could conceivably run across a C3/1B, a 4 stitch cable where you have three stitches passing in front of a single stitch. At times you may also see a notation such as C2/2F which would mean the exact same thing as C4F – only more spelled out.

That is pretty much it in a nutshell. As long as you remember the 3 distinct sections of a cable abbreviation you should be able to be able to read a set of written instructions for a cabled piece.  I had planned on explaining the Right/Left notation and how it differs from Back/Front in this post but this has gotten a bit long and it might be enough to ponder for now. There will be a Part Two of this post coming in the next few days that will hopefully clear things up.

If you have any questions, please feel free to pipe up and I will do my best to figure it out! If I can answer the question in the comments I will, but if not it might show up in Part Two!

Part Two is live and you can read it here.


*Originally I had the following “If the number is even then it is actually telling you that the number of stitches that you will be working with is actually double the number shown. In this example the number is 2, so you will be making a 4 stitch cable – 2 crossed over two. (More on this in a wee bit.)”  Because I have see cables written like that. After CatBrown (thank you!) made her excellent observation in the comments I did a bit more digging and found that this is the less common way of doing things. As I said – the best thing to do is read the instructions in your pattern.

If that isn’t working out, consider the context of your pattern. If you have a picture take a look at it. If it looks like a big honkin’ cable and your instructions are C4F then most likely it is 4 over 4 as opposed to a 2 over 2. The lack of standardization can be frustrating at times!

Curiouser Mitts

Let’s talk about fingerless mitts. I am a huge fan of fingerless mitts, the one pair that I have made for myself is probably my most worn knitted item. They are imminently practical and are usually fun, quick knits. You can easily get a pair out of most any single skeins of yarn or partial balls you have left laying around.

Easy and fun, but there are things about some of the available patterns that I do not care for – and please know that these are just my personal preferences and not meant to cast aspersions on the design choices of anyone else.

1) I love the look of “reflected” mitts. Where there is a distinct left and rightness to the hands. Unfortunately this usually means that you have two sets of instructions for the two mitts – which makes the knitting process less fun and easy. Then, once they are made you have to make sure you get the right one on the right hand.

2) Picking up the thumb. While I do not care for the “hole to stick your thumb out of” method of creating thumbs (vastly preferring a gusset) I also do not like transferring the thumb stitches to waste yarn, picking up the stitches later and then knitting the 4 – 5 rows of both thumbs creating thusly four new ends to weave in.

3) One size fits all – but mostly all women who have relatively small hands.

So, obviously when I set out to make a pair of mitts to match …and Curiouser, I had an agenda.

Curiouser Mitts by Barbara Benson

Curiouser Mitts – one skein of Finito

I used a gusset, but worked it up to the point where it covered enough of the thumb to get away with simply binding off – it does not provide full thumb coverage, but you can always transfer to waste yarn and add your own thumbs if that is what floats your boat.

Curiouser Mitts by Barbara Benson

See the thumbs? No extra ends to weave in!

The pattern as written is designed for a medium hand with instructions to make it smaller for the petite and larger for, well, the larger. 😉 I like a little positive ease in my mitts – so these fit me perfectly. My husband has long thin hands and they fit him also.

Curiouser Mitts by Barbara Benson

Somehow these are pretty darn unisex

For the reflected patterning – I TOTALLY CHEATED. If you look carefully you will see I lifted the lace, cable and seed stitch patterning out of the shawl to make the pieces match, but it is the positioning of the elements that is the cheating. The cable is situated directly opposite of the thumb gusset with a stockinette/seed stitch gap separating the two. When you put the mitts on you instinctively scootch the thumb around so it is offset towards your palm. This rotates the cable around to the pinky edge of the back of your hand providing the illusion of reflected patterning without any reversing of the shaping or fiddling with the position of the thumb.

And, when you put them on it doesn’t matter which hand they go on. In my wacky brain I think of them as ambihandrous. 

As with …and Curiouser the original mitts were made with one skein of Malabrigo Finito worked at a fairly loose gauge. With these mitts it makes a big difference on the softness, but it also creates a situation where if you use a tightly spun sock weight yarn you will end up with a rather holey looking fabric. Now, if you have small hands you can simply go down needle sizes until you are happy  –  you will simply have smaller mitts. But if you are looking to keep the size (or even size up a bit) it will be better to substitute a Sport weight yarn.

Curiouser Mitts by Barbara Benson

Working on the Iphone, a perfect application for fingerless mitts

The mitts pictured that I made for my husband had just such a substitution. I had a partial skein of Prostetnic Vogon Jeltz Bugga! left over from another project and I used that at the same gauge. It worked beautifully. Unfortunately the colorway has been retired – but if you really like these, the lovely dyer of Cephalapod Yarns has been known to resurrect colorways if she receives enough requests.

So – are you going to make a pair for the man in your life or for yourself? (I am aware that there is a distinct possibility that the man in your life is yourself – rock on guy knitters!)

and Curiouser

Stitches South!

Let me explain … no, no, no, there is too much. Let me sum up …

Crazy, and crazy fun. While it is no where near as enormous and overwhelming as Rhinebeck was, it is still a whirlwind of activity. I had a ton of fun and saw a ton of awesome textile based stuff. Unfortunately I left my camera in my hotel room so you will have to take my word for it.

This was my third year at Stitches, but the first one where I wasn’t working the floor, which made for a different experience. I had expected it to be more leisurely, but I was mistaken in that assumption. I still ran around like  chicken with my head cut off. Unlike previous years, I managed to take a class. The talented Candace Eisner Strick taught “Two hands, Two Colors, Two Ways” and packed a huge amount of learning in the 3 hour class.

I learned how to tension the yarn in my opposing hand (right for me, I am a continental knitter) and knit with the yarn held that way. Then we knit with yarn in both hands. Then we knit backwards with the yarn in both hands. Really! Backwards! No flipping over and doing return purl rows. The final, mind bending, trick was to weave in long floats along the way. In both directions. It was b-mazing.

And then, of course, the market floor was a treasure trove of STUFF. I managed to restrain myself with regards to spending, but I got a few – choice – items. All in all I purchased 5 skeins of yarn and 4 books. 3 of the books are in languages that I cannot actually read. But more on all of that later, now I need to tell you about my newest pattern that debuted in the Market. It is a piece that I worked on with a local yarn store for them to sell in a kit.

The whole time I was knitting Curiosity it kept whispering to me cables, lace, you know you want to … but I was trying to keep things simple and elegant. So I was hard on myself. But when the idea of doing this kit came up all bets were off. This shawlette is designed to make the most out of a single skein of Malabrigo Finito, which is only 200 yards of fingering weight. But what luxury is packed into those yards! Lofty and soft I chose to knit it at an open gauge to let the yarn achieve it’s full softness potential.

One skein shawl for 200 yards

A detail of the lace and cables

The cables are slip stitch cables to help break up the more variegated color ways and the lace is a one-liner. Once you get into the rhythm, it isn’t a particularly hard pattern. And, as with Curiosity, it is amenable to yarn substitution. You can use anything from lace weight up to DK and still have a lovely drape (based on your gauge) and you can knit for as long as you feel like knitting. If you would rather have a full sized shawl then just keep adding yardage. Then there is an added bonus of button holes built into the lace pattern – to help with keeping the wrap all wrapped up.

Fingerless Mitts from Malabrigo Finito

So many ways to wear this piece!

Ever unable to leave well enough alone, I had a second skein of Finito so I made a matching pair of mitts – which are also now available. But this post has gotten long enough. More on the specifics of these lovelies later, I will probably mix it in with more Stitches South.

So, what do y’all think?