Cabling without a Cable Needle

I love wee cables. Something about the texture and sinuous nature of only a couple of stitches wrapping around each other just makes me happy. Possibly it is just part and parcel of a general attraction for cute little things, but whatever – I own it.

Tiny cables on the edge of In Uffish Thought, a shawl by Barbara Benson.

The cables on the edge of In Uffish Thought are a perfect example.

What I don’t like is doing lots of small-ish cables using a cable needle. All that picking it up and putting it down? I end up with it in my teeth, or jammed into my hair, or stuffed in my cleavage … you know how it is. So I don’t. Use a cable needle that is. I cable without a cable needle, seems like an obvious solution, eh?

And you know what? It isn’t hard or scary and it is the subject of my latest video. If you would like to learn how to do it yourself (or just see if how I do it is different from how you do it) check it out!

If you have a technique that you would like to see me demonstrate, please drop it in the comments of the video or this here bloggie blog.

Anatomy of Cable Abbreviations, part two

I seriously had to resist naming this post “part Deaux” orĀ  “Abbreviations Reloaded” or “The Cable Strikes Back” … I am just full of the silly.

Onward and upward!

Learn how to decipher a written cable abbreviation in a knitting pattern, part Two. -TumpedDuck

Cable/cross two right

Diving right back into crossing cables – we are now looking at Right and Left cables.

To start off with, these are 100%, absolutely identical to the Front and Back cables in execution, we are just looking at different nomenclature. Po-tay-toe, po-tah-toe as one says. Now for the break down

  1. C – once again letting you know you are fixin’ to cable or “cross” your stitches. This is the same as understanding that ‘k’ is telling you to knit and ‘p’ is telling you to purl.
  2. A Number – nothing new here. This is letting you know how many stitches are involved in your upcoming cable. In this case you will be crossing 2 stitches, but how? (As usual, if the number is even it is assumed that you will split the stitches evenly.)
  3. Direction – here is where things are changed up. With Front and Back you are being told what to do with the stitches. Left and Right lets you know what the end appearance of the cable will be after you have completed the stitch swap. Yeah. I know. It is time for a picture
Understanding how a Right Cable moves - TumpedDuck

A Right Cable


What you see to the right is a Right crossing cable. The black arrow represents the stitches moving to the front and the brown arrow is the stitches moving to the back. Right is referring to the direction of movement of the stitches that are held to the front of the work. The arrows show the directionality of the stitches. When considering the constituent stitches of the cable (here there are a total of two stitches) you are moving the left-most stitch to the front and over the right-most stitch.

Try to remember: in a Right cable the front stitches move from left to Right.

Learn how to decipher a written cable abbreviation in a knitting pattern, part Two. -TumpedDuck

Cable One over Two Left

Understanding how a Right Cross Cable (CL) moves. - TumpedDuck

A left Cable

As in the Back/Front cables, you can also have an uneven number of stitches and the abbreviation works pretty much the same way.

  1. C – I think you might have this by now. C = this is a cable. You, dear knitter will be cabling before you know it!
  2. A Number – remember, this is not a fraction. The / symbol should be read as “over”, so this tells you that it is a one over two cable. If you were passing two stitches over one then the number would be written 2/1.
  3. Direction – this is a Left cable so you know that your end result is a cable where the front stitch(es) appear to twist to the Left. In the case of this stitch you already know from the number that your single stitch is passing over the other two stitches. Because this is a Left cable that means that the first stitch is held to the front, you knit the next two stitches and then the held stitch. The single stitch is passing from the right to the Left. If you follow the diagram to the right you can see the black arrow representing the direction the front stitches move.

For a Left cable try to remember that the front stitches mover from the right to the Left.

Now, I find the Left/Right naming convention to be considerably more confusing than the Front/Back, but to each their own. Whatever clicks the best in your brain you just go for it! If you need to draw parallels between the two styles of naming you can try to remember that Right = Back and Left = Front. My mnemonic for that is R&B. For some reason my musical nature always associates R&B together (Rhythm and Blues anyone?) so I can remember that R(ight) goes with B(ack).

Incidentally, this is the same way I remember how to work a Right leaning increase. When you want your M1 to lean right you pick the strand up from the back. R&B just go together (in my crazy brain). Do you have any knitting mnemonics?

Anatomy of Cable Abbreviations

My newest project has been working on cables. For some reason lace came instinctively to me. YO = hole. Big circle on a chart = hole. Even the basic increase and decrease abbreviations and symbols made complete sense. (Well, I admit to having a bit of difficulty remembering which of ssk vs k2tog leaned which way) But cables are a challenge.

Not precisely a challenge to actually knit , I can follow instructions just fine. But to truly internalize what all of the symbols mean – well, that has taken some time. And I don’t know that I can say with 100% certainty that I have got it. Hopefully I am close. While writing a pattern I have had to come to a concrete decision on one particular issue. Abbreviations. I have to pick a style and stick with it, and there lies the conundrum.

Are the two kinds of cable crosses Front/Back or Right/Left. They both mean the same thing but represent two different ways of thinking about things. To prevent any suspense, I settled on Front/Back because that is what makes the most sense to me. But there really isn’t a correct way of doing it. As long as I remain consistent I hope that everything will work out all right.

To the subject at hand. For now I don’t want to address reading cables on a chart. It isn’t that difficult to find guides to reading charted cables, but when I started really looking online to find somewhere that breaks down understanding the abbreviations used in written instructions for cabling – well, I came up a bit short. I am going to put this out there, and it is my understanding of how it all works. If I have erred at some point, please do not hesitate to let me know personally or in the comments. As I said, I have come to grips with cables through a difficult path and I might have miss-stepped along the way.

The best way to understand how to cross a cable is to read the instructions provided in the pattern. A good pattern writer will describe how you are to execute the cable based on the abbreviation they use. That being said, I would like to arm you with the ability to suss out what the cable means if you are in a situation where details are unavailable. Onward (allonz-y)!

Learn how to decipher a written cable abbreviation in a knitting pattern. - TumpedDuck

Cable Two Back

This is what a basic cable abbreviation looks like. The specific cable illustrated would be written out Cable Two Back. The abbreviation can be broken down into three elements – which I have labeled as such.
  1. C – this big ole c starting things off announces, “Hey, we are fixin’ to cable!”. Some say that the C stands for cable others that the C stands for cross. Regardless, when you see the C prepare yourself to cable.
  2. A Number – the number tells you how many stitches are involved. (edited for accuracy, for original see*) In this example there are two stitches involved which will be crossing one over one. You could also see C4B – which would indicate crossing 2 over 2, C6B … and so forth.
  3. Direction – this tells you whether you are crossing Front or Back. This letter can be one of four options B, F, R or L. For now we are sticking to F & B, specifically looking at a Back cross. When dealing with the Front/Back naming system you are being instructed what to do with the first stitches you come to. With Back this tells you that the first 2 stitches of your 4 stitch cable will be held to the Back of the work, the next two stitches will be knit (and therefore cross to the front of the work) and then you will knit the stitches from the cable needle.

If there is no number, meaning that you have run across the abbreviation CB or CF, then you can safely assume that it is a 1/1 cable. With CB you would hold the first stitch to the back knit the next stitch and then knit the held stitch. With CF you would hold the first stitch to the front knit the next stitch and then knit the held stitch. Pretty much C2B and CB mean the same thing. Capiche?

Learn how to decipher a written cable abbreviation in a knitting pattern. -TumpedDuck

Cable One over Two Front

But what do we have here? There appears to be a fraction in the middle of my cable! Looks can be deceiving, there is no fraction (waves hand). It is a different kind of cable.

  1. Why hello there Mr. C – you are once again telling me that we shall be cabling forthwith.
  2. A Number – but what a strange looking number indeed. When you see this notation it is telling you that you have an uneven cross. It is not a fraction but instead the number of stitches that you are working with (as above). This particular one is a One over Two cross. The number in the first position tells you how many stitches will be at the Front of the work and the second number tells you how many stitches will travel behind, regardless of whether or not it is a Front or Back cross because …
  3. Direction – and here we have a Front cross. As I said above this tells you what to do with the first stitches you encounter. You will have to do a little figuring with this. You have a 1/2 cross which means that you know that you will need to be holding 1 stitch to the front of the work and crossing two stitches behind – but in what order? The Front tells you “Hey, the first stitch you come to goes to the Front!” so you would take the first stitch, hold it to the front of your work, knit the next two stitches and then knit the held stitch. The reflected version of this stitch is C1/2B. Reading it you would hear “Hey the first stitch(es) you come to go to the Back!” and since it is a 1/2 Cross (where you know the single stitch always goes to the Front) you would hold the first two stitches to the Back knit the next stitch, and then knit the two held stitches.

These uneven crosses are usually an uneven number 2/3, 1/2 but they can be an even number of stitches that are worked unevenly. You could conceivably run across a C3/1B, a 4 stitch cable where you have three stitches passing in front of a single stitch. At times you may also see a notation such as C2/2F which would mean the exact same thing as C4F – only more spelled out.

That is pretty much it in a nutshell. As long as you remember the 3 distinct sections of a cable abbreviation you should be able to be able to read a set of written instructions for a cabled piece.Ā  I had planned on explaining the Right/Left notation and how it differs from Back/Front in this post but this has gotten a bit long and it might be enough to ponder for now. There will be a Part Two of this post coming in the next few days that will hopefully clear things up.

If you have any questions, please feel free to pipe up and I will do my best to figure it out! If I can answer the question in the comments I will, but if not it might show up in Part Two!

Part Two is live and you can read it here.


*Originally I had the following “If the number is even then it is actually telling you that the number of stitches that you will be working with is actually double the number shown. In this example the number is 2, so you will be making a 4 stitch cable ā€“ 2 crossed over two. (More on this in a wee bit.)”Ā  Because I have see cables written like that. After CatBrown (thank you!) made her excellent observation in the comments I did a bit more digging and found that this is the less common way of doing things. As I said – the best thing to do is read the instructions in your pattern.

If that isn’t working out, consider the context of your pattern. If you have a picture take a look at it. If it looks like a big honkin’ cable and your instructions are C4F then most likely it is 4 over 4 as opposed to a 2 over 2. The lack of standardization can be frustrating at times!

Blog Love

I read a lot of blogs, no exaggeration needed. Enough that when I just went and opened up my Feedly window and it didn’t count them for me I realized that I didn’t want to count them.

Obviously I read a load of knitting/yarn blogs, but I also have about the same number of food blogs that I follow. And then there are the ones I have sorted into the “inspirational” category that are mostly fashion and design blogs. You never know where inspiration is going to arise, so I have things like but does it float, Design*Sponge, and NOTCOT that I peruse every couple of days.

FeedlyCaptureDesign

If you have any knitting, food or design blogs that you think are particularly inspirational, educational, or fun I would love to hear about them in the comments!

With knitting blogs, I particularly like educational posts where experienced knitters pass on tips and tricks, I collect these on a Pinterest board named Knitting Stitches and Techniques that you might want to follow. But I thought I would share a couple of my favorites here too!

Some medium/advanced tips:

Needle Material Affects Gauge

This fantastic post from Alexis Windslow provides the best explanation and proof on how your needles can change what gauge you get. Bookmark this now.

Knitted on Border – How to

Miriam Felton provides a photographic, step-by-step explanation of how to work a knitted on border. You will be empowered after looking at this.

Yes you CAN

…fix a twist when knitting in the round! Wise Hilda works magic on working in the round, showing you how to fix a twist after you have joined to work in the round (but before you start your second round).

And a couple of simple, but awesome tips:

Use a Side Marker

A simple idea that can save you a boat load of time and frustration from Tamara Goff

Carrying yarn while switching colors

Not that the PurlBee needs any more traffic to their awesome blog, but this is something that is often taken for granted and rarely explained. When you carry yarns while knitting stripes – how exactly do you do that?


Lifting strands with slipped stitches

I got a new program. It is a fancy pants type drawing program, not as fancy as Illustrator, but fancy pants enough for me. Hopefully it will help make my patterns better, but first I have to figure out how. This need to figure led to a good bit of experimentation last week as I decided to make some illustrations for a class I was teaching.

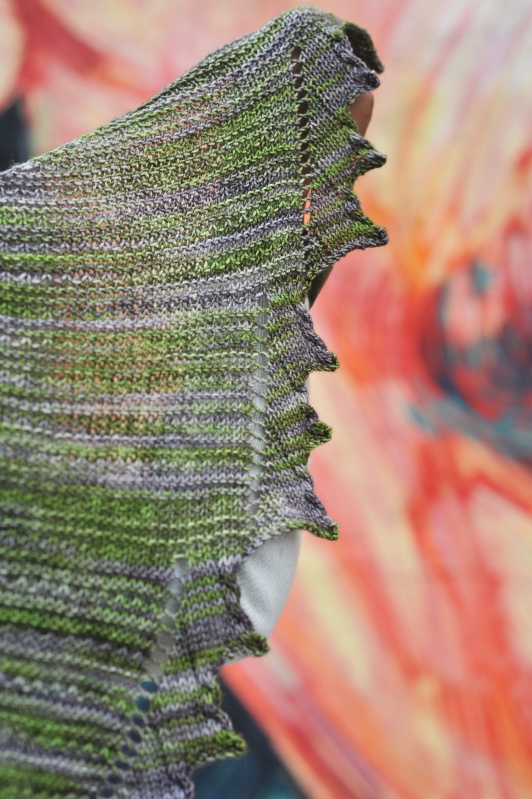
The LYS that I work at (Lovin’ Knit) offered a class on my Roller Coaster Cowl and it was as crazy as the name of the cowl. I hope that my students learned something, I certainly did. I learn everything from every class I teach and hopefully improve for the next one. For the class I decided to use my new program to diagram one of the trickier techniques in the pattern – which involves lifting the strands of a slipped stitch. Since they worked so well I thought I would put a portion of it on here for the edification of the interwebs. It isn’t everything because I can’t give away all of the cowl’s secrets, can I?

But, to make up for the cards I am not playing, I have come up with some additional content that hopefully will help a few people out.

Illustration of slipping stitches

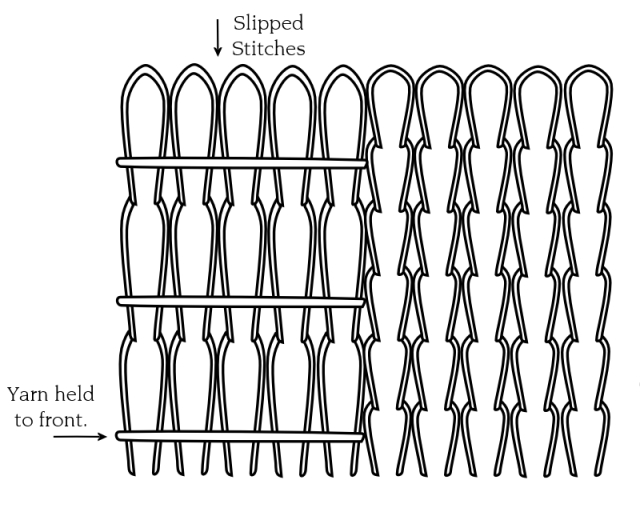
Read from right to left we have 5 knit stitches and 5 slipped stitches

So, first of lets look at the basic concept of lifting the strands that are created when you slip a stitch. In the above illustration I have shown six rows of fabric knitted in stockinette with slipped stitches. Reading as you knit (right to left) you have stockinette and then slipped stitches. The line by line description of the above, worked flat, would be:

Rows 1, 3, 5 – k5, s5 with yarn in front

Rows 2, 4, 6 – purl

As you can hopefully see, when you slip stitches with yarn held to front it forms a strand of yarn across the face of your knitting. It is important to hold the yarn lightly with tension so that you do not buckle your fabric. Once you have finished these rows you can then go back and lift these strands to create a decorative effect.

An Illustration of lifting strands

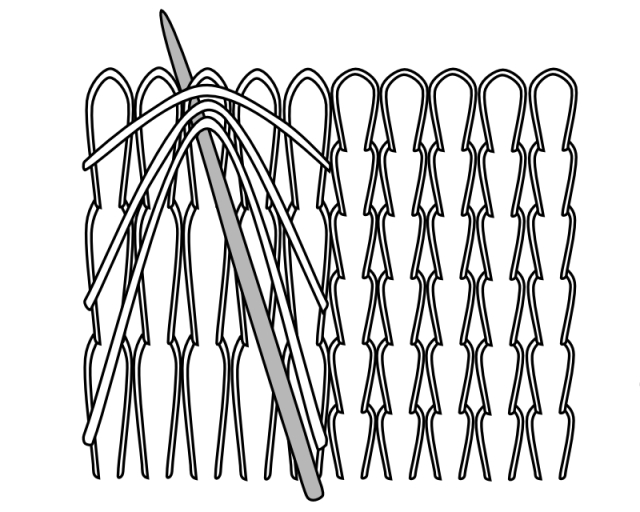
This is the left hand needle, the right hand needle is not shown.

To do this you insert your needle under the strands that are floating across the front of the fabric and lift the strands so that you can insert the needle to make a knit stitch. Pull the working yarn through just like when you make a knit stitch, extracting the new stitch out from underneath the lifted strands. Make sure that the new stitch has the same tension as the proceeding stitches which will cause the strands to pull up and look like a butterfly.

Got it?

The Roller Coaster cowl uses a similar, if slightly more challenging, technique. I found the stitch in one of Barbara Walker’s stitch dictionaries and it is called the “Dimple Stitch”. It creates a highly textured and buckled surface while at the same time making an interesting reverse side – elements that attracted me to using it in a cowl.

First lets look at the differences in these lifted stitches. First off, you are slipping the stitches purl-wise with yarn held to the back of the work. The illustration above is how the piece looks from the Wrong Side of the fabric. You can see that there are 3 purl stitches and then 3 stitches that are slipped for 3 rounds of knitting. The line by line description, worked in the round, would be:

Rounds 1, 2, 3 – k3, s3

Rounds 4, 5, 6 – knit

Illustration of yarn held to back

You are looking at the Wrong Side of the work here.

This is repeated and then you are to lift the floating strands. You will note that you are lifting the strands over a significantly further difference, which causes the fabric to buckle. This is on purpose and creates the “dimple” effect. There are two places in the sequence of rounds where you are lifting stitches. The first time you are purling the lifted stitches into the first column where there are slipped stitches and the second go-round you are purling the lifted stitches into the 3rd (and last) column where there are slipped stitches.

Yeah, that is hard to grok isn’t it?

Illustration of lifting strands from wrong side

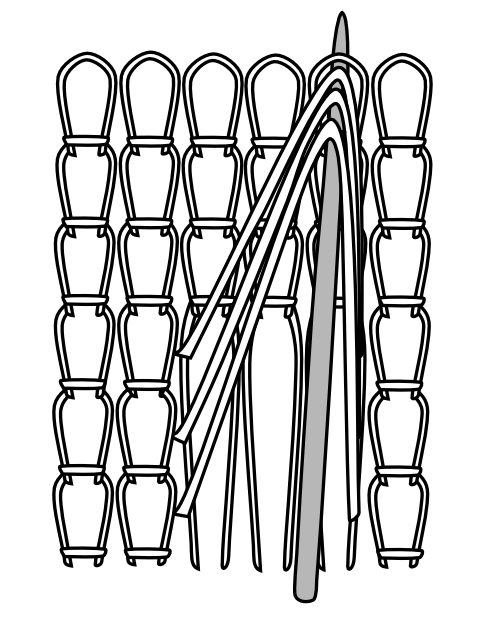
We have shifted our view slightly to see the framing stitches.

This is why we need an illustration. Above you will see that we have the reverse of knit stitches on either side of our slipped stitches (again, we are looking at the Wrong Side). In this illustration I am showing the needle inserting in underneath the floating stitches, lifting the stitches up and then inserting purl-wise from the wrong side into the 3rd column of the slipped stitch grouping.

To accomplish this you need to have moved the yarn into purl position, tilt your work towards yourself so that you can see the back side of your work, and then you insert the needle from beneath the lifted strands. You lift up those strands and insert the needle from back to front through the front leg of the stitch and pull through your working yarn. The final tricky step is to pull that stitch out from under the three lifted stitches. With the right twist of your wrist you can pop that stitch out, but it is equally valid to use your left hand needle to pass the three lifted strands forward over the new stitch like you were doing a PSSO. However you accomplish it, you should end up with only the purl stitch on your right hand needle – tensioned as the stitches that are already on your needle.

The crazy thing is, this takes longer to explain than to execute. Once you have done it a couple of times it will be old hat. I hope that this might help some people out that might have difficulties with either lifting the strands for something like the Butterfly Stitch or who are wrestling with the Roller Coaster Cowl!

So, what do y’all think of my new program? Is this kind of thing helpful? Is there anything that you would like to see in the future?

Lifeline

Two Color knitting on a needle

As soon as you put it in, you know you won’t need it.

Believe it or not, I have been a knitting fiend recently, just not much I can show. Hopefully the above picture is “artful” enough that you cannot really tell what is going on. You can tell it is two color, but hopefully that is it.

A third color? Oh yeah, that is my lifeline. I rarely use lifelines, and usually only after I needed them about an hour ago. But I decided to put this one in because the ending to this shawl just wasn’t working out for me. When I started this piece it was pretty much charted out completely – but the ending just didn’t cut it.

There is only so much I can do in the planning stages, some things just have to be worked out on the needles. Doing things this way I am often surprised. Sometimes the surprise is pleasant. Sometimes I need the lifeline.

If you have never put in a lifeline, it is pretty easy. I like to use mercerized cotton because it is pretty slippery, cheap and in an obnoxious color that rarely matches my work. To put a lifeline in you simply use a tapestry needle and run the waste yarn through the stitches in the row that you just finished.

Always insert your needle purl wise and avoid going through any stitch markers you might be using. If you go through a stitch marker, well, you will know it on the next row. I don’t bother with trying to measure out an appropriate length of yarn. I simply use the end while it is still attached to the ball and then cut it off when everything is said and done. Also, leave plenty of “tail” hanging out either side ofĀ  your piece. You don’t want the stitches to work their way off the end of your holder.

Easy peasy.

What exciting things have you been working on?

Won’t Quit my Day Job

Yesterday I decided to do a little dabbling in a field related to knitting, ie: dying yarn. I had absolutely no expectations that I would identify a long hidden talent with my savant like dye job – and I must say that I was not disappointed.

Somewhere on the internet I had read something about dying yarn in cake form and it magically becoming a gradient. Woo Hoo, for shortcuts. And then I vaguely remembered being able to dye with food coloring. I just so happened to have some Wilton’s Powdered icing coloring stuff and a cheapo ball of yarn lying around, so hey – no time like the present.

The Creature from the Blue Lagoon

Apparently Kool-aide brings its’ own acid to the party, but I needed to add acid myself. I also figured that the dye would wick into the ball better if the yarn was already wet. Into a measuring cup went a mixture of water and vinegar and the yarn ball.

It floated.

I piled a plate and a can of potatoes on top and let it sit for a good long while. It took forever for the bugger to quit floating. While this was going on I mixed water, dye powder and vinegar in my little crock pot (usually dedicated to delicious, delicious cheese dip) and started it heating up.

Once the ball sank, it went into the hot-tub for a good long while. It looked fabulous. Until I took it out and poked it with some chopsticks and identified that the dye had only penetrated about 1/2 inch. So I got my trusty ball winder and re-wound it from the outside – effectively turning it inside out. After adding more dye to the crock-pot I chucked the yarn back in.

Deceptively dyed looking yarn.

The little bugger floated, but I decided not to worry about it and got a hard cider. After several more hours I fished it out and re-skeined it to see what I had wrought. That is a whole story in and of itself – a hint? At one point the swift collapsed.

Finito, except for I need to rinse some more. And maybe nuke it.

It was almost midnight by the time I got finished and this picture was taken with the on-camera flash. It sucks more than a Dyson vacuum, but you get the idea. Lesson of this story? I am gonna stick to buying awesome yarn from awesome dyers who know what the heck they are doing.

Do you have any indy dyers that you love and would recommend to me? Please feel free to share links in the comments (even if you are the dyer in question – toot your own horn!)

Twisted German Cast On

This is my favorite cast on. It seems silly to even have a favorite cast on, but there you are. This one has two specific traits which I find desirable; it is very stretchy and it is very stable. Many of the “stretchy” cast ons get their stretchiness from being very flimsy – barely there cast ons. I need something beefier, more substantial. Enter the Twisted German.

Which sounds very nefarious. Zee Twisted German Cast-on vill make you happy, Ja? But it isn’t. It should be something more like the Happy Swedish CastĀ  on – because it really is very easy. It’s only drawback is that it is a long tail variant, which means you have to pull out a length of yarn and hope that you have the right amount.

I know there are good ways to figure out how long to make the “tail” but I seem to muck it up every time. Luckily I use it for my crescent shaped shawls, and they only have a cast on of 7 or 8 stitches – so it isn’t a big deal if you are off by a bit.

Hopefully I have talked this up enough to make you want to try it out. If so – I made a video. It’s my first, so be gentle.