I got a new program. It is a fancy pants type drawing program, not as fancy as Illustrator, but fancy pants enough for me. Hopefully it will help make my patterns better, but first I have to figure out how. This need to figure led to a good bit of experimentation last week as I decided to make some illustrations for a class I was teaching.
The LYS that I work at (Lovin’ Knit) offered a class on my Roller Coaster Cowl and it was as crazy as the name of the cowl. I hope that my students learned something, I certainly did. I learn everything from every class I teach and hopefully improve for the next one. For the class I decided to use my new program to diagram one of the trickier techniques in the pattern – which involves lifting the strands of a slipped stitch. Since they worked so well I thought I would put a portion of it on here for the edification of the interwebs. It isn’t everything because I can’t give away all of the cowl’s secrets, can I?
But, to make up for the cards I am not playing, I have come up with some additional content that hopefully will help a few people out.
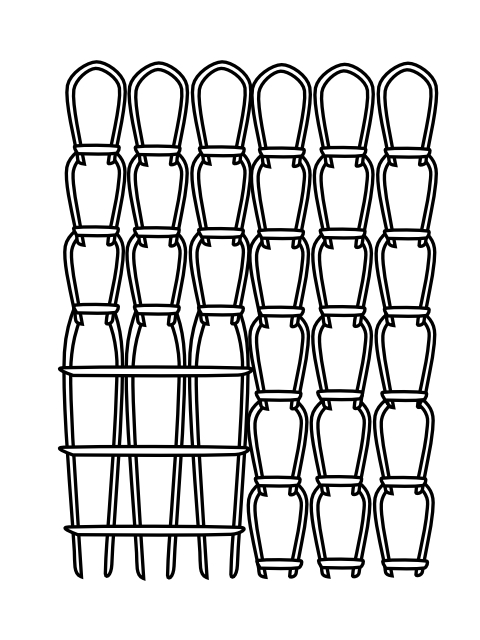
So, first of lets look at the basic concept of lifting the strands that are created when you slip a stitch. In the above illustration I have shown six rows of fabric knitted in stockinette with slipped stitches. Reading as you knit (right to left) you have stockinette and then slipped stitches. The line by line description of the above, worked flat, would be:
Rows 1, 3, 5 – k5, s5 with yarn in front
Rows 2, 4, 6 – purl
As you can hopefully see, when you slip stitches with yarn held to front it forms a strand of yarn across the face of your knitting. It is important to hold the yarn lightly with tension so that you do not buckle your fabric. Once you have finished these rows you can then go back and lift these strands to create a decorative effect.
To do this you insert your needle under the strands that are floating across the front of the fabric and lift the strands so that you can insert the needle to make a knit stitch. Pull the working yarn through just like when you make a knit stitch, extracting the new stitch out from underneath the lifted strands. Make sure that the new stitch has the same tension as the proceeding stitches which will cause the strands to pull up and look like a butterfly.
Got it?
The Roller Coaster cowl uses a similar, if slightly more challenging, technique. I found the stitch in one of Barbara Walker’s stitch dictionaries and it is called the “Dimple Stitch”. It creates a highly textured and buckled surface while at the same time making an interesting reverse side – elements that attracted me to using it in a cowl.
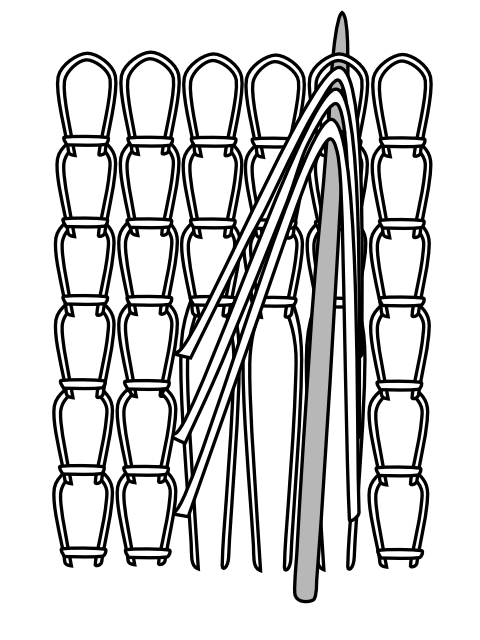
First lets look at the differences in these lifted stitches. First off, you are slipping the stitches purl-wise with yarn held to the back of the work. The illustration above is how the piece looks from the Wrong Side of the fabric. You can see that there are 3 purl stitches and then 3 stitches that are slipped for 3 rounds of knitting. The line by line description, worked in the round, would be:
Rounds 1, 2, 3 – k3, s3
Rounds 4, 5, 6 – knit
This is repeated and then you are to lift the floating strands. You will note that you are lifting the strands over a significantly further difference, which causes the fabric to buckle. This is on purpose and creates the “dimple” effect. There are two places in the sequence of rounds where you are lifting stitches. The first time you are purling the lifted stitches into the first column where there are slipped stitches and the second go-round you are purling the lifted stitches into the 3rd (and last) column where there are slipped stitches.
Yeah, that is hard to grok isn’t it?
This is why we need an illustration. Above you will see that we have the reverse of knit stitches on either side of our slipped stitches (again, we are looking at the Wrong Side). In this illustration I am showing the needle inserting in underneath the floating stitches, lifting the stitches up and then inserting purl-wise from the wrong side into the 3rd column of the slipped stitch grouping.
To accomplish this you need to have moved the yarn into purl position, tilt your work towards yourself so that you can see the back side of your work, and then you insert the needle from beneath the lifted strands. You lift up those strands and insert the needle from back to front through the front leg of the stitch and pull through your working yarn. The final tricky step is to pull that stitch out from under the three lifted stitches. With the right twist of your wrist you can pop that stitch out, but it is equally valid to use your left hand needle to pass the three lifted strands forward over the new stitch like you were doing a PSSO. However you accomplish it, you should end up with only the purl stitch on your right hand needle – tensioned as the stitches that are already on your needle.
The crazy thing is, this takes longer to explain than to execute. Once you have done it a couple of times it will be old hat. I hope that this might help some people out that might have difficulties with either lifting the strands for something like the Butterfly Stitch or who are wrestling with the Roller Coaster Cowl!
So, what do y’all think of my new program? Is this kind of thing helpful? Is there anything that you would like to see in the future?


